Sunday, May 26, 2013

CARA MEMPERCEPAT LOADING WINDOWS 7 SEVEN

CARA MEMPERCEPAT LOADING WINDOWS 7 SEVEN. Saat mengklik tombol Start maka akan bermunculan menu-menu yang disebut dengan Menu Start atau Start Menu. Kecepatan munculnya menu-menu tersebut telah diset secara default oleh Windows (biasanya nilai default-nya 400), Akan tetapi kita dapat mengubah dengan settingan default pada MenuShowDelay seperti 100, 50 atau 0, lebih kecil agar menjadi lebih cepat. Adapun caranya sebagai berikut:

Langkah Pertama : Klik Menu Start, akan muncul tampilan seperti di bawah

Langkah kedua : Ketik regedit pada kolom searching dan akan muncul jendela seperti gambar di bawah

Langkah Ketiga : Klik HKey Curent User/Control Panel/Desktop lalu klik MenuShowDelay

Langkah Keempat : Setelah diklik MenuShowDelay akan muncul jendela Edit Starting. Terlihat setting default Window dengan nilai 400.

Langkah Kelima : Ganti nilai default 400 dengan nilai yang lebih kecil, seperti 100, 50, atau bahkan 0. Semakin kecil nilai yang kita pilih akan semakin mempercepat pemunculan menu-menu yang ada.

Langkah Terakhir : Klik OK kemudian tutup semua jendela dan restart Laptop/Komputer. SELESAI

Sunday, May 19, 2013

CARA PARTISI HARDISK DENGAN ACRONIS DALAM HIREN BOOT CD

Cara Mempartisi Hardisk Menggunakan Acronis dalam Hiren Boot CD
-Masukan cd hiren
-Seting prioritas booting di cd
-Akan tampil pilihan seperti berikut :
-pilih start hiren boot cd kemudian enter
-Akan muncul pilihan, pilih sperti gambar (gambar dibawah ini),kemudian enter
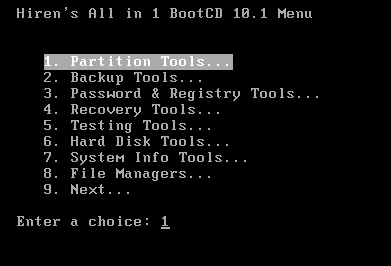
-Kemudian akan muncul (gambar dibawah), pilih sesuai gambar, kemudian enter


-Akan muncul:

-proses berlangsung jika ada dialog box (muncul pertanyaan) biarkan saja, sampai muncul dialog box berikut:

-pilih yes, maka akan masuk ke menu acronis seperti berikut:
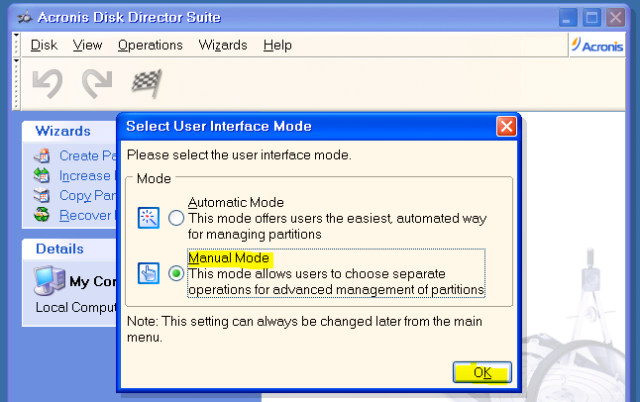
-pilih manual mode, kemudian ok
-akan muncul:
-gambar diatas menunjukan hardisk belum terpartisi, maka pilih kemudian klik create partition (yang diwarna kuning)
-akan muncul:
-isi label missal dicontoh diberi nama label system
-pilih file system dalam contoh dipilih NTFS
-pilih create partition as, karena digunakan untuk system maka dipilih sebagai  primary partition sehingga akan menjadi demikian:
-kemudian tentukan besarnya partisi (seperti yang diwarna kuning=2 GB), kemudian klik OK, maka akan tampil demikian:
-gambar diatas menunjukan bahwa partisi system sudah jadi dan menyisakan sekitar 2 GB partisi kosong yang akan kita jadikan partisi DATA, seperti berikut langkah-langkahnya:
-pilih unlocated tersebut, kemudian pilih create partition sampai muncul:
-rubah menjadi demikian

-akan muncul:
-berikutnya seperti gambar diatas pilih gambar bendera/commit (yang diwarna kuning), maka akan muncul:
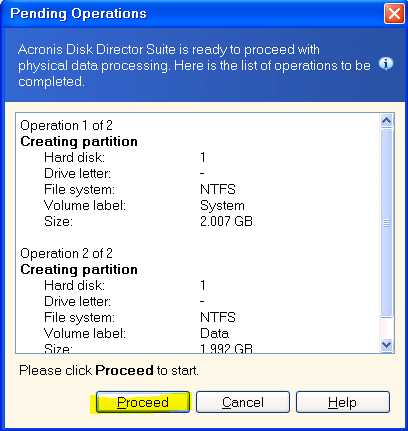
-tekan proceed sampai muncul proses seperti berikut:

-jika proses berhasil akan muncul proses has successful pilih ok
-untuk keluar  pilih disk—exit atau tekan ctrl+alt+del
Demikianlah langkah-langkah partisi selamat mencoba semoga bermanfaat.

Sumber....

Friday, May 17, 2013

CARA RESET PASSWORD WINDOWS XP

Seorang teman kantor ada yang mengeluhkan PC nya yang menggunakan windows xp tidak bisa booting. Karena masalah seperti ini sudah pernah dialami dan berhasil diatasi, tanpa pikir dan mencari solusi yang panjang langsung saja saya buka contekan yang pernah saya tulis di blog ini mengenai masalah NTLDR is missing.
Saya pikir masalah bisa cepat selesai teratasi dengan masuk ke sistem repair console. Namun ada masalah baru yang saya hadapi. Ternyata user tidak mengetahui password administrator komputernya. Sehingga repair NTLDR dari console pun tidak dapat dilanjutkan. Usaha perbaikan masih tetap saya lanjutkan. Karena saya harus perbaikan NTLDR dengan console sudah tidak dapat dilakukan, saya lakukan perbaikan otomatis dari cd windows yang tentunya memakan waktu lebih lama dari perbaikan console.
Lalu dimana cara me reset password administrator windows nya ?
 Langsung saja step by step.

1. Lakukan booting Booting dari CD Windows.
2. Saat sampai pada jendela Welcome to Setup, tekan Enter
3. Tekan F8 saat tampil jendela Lisence Agreement
4. Pilih sistem windows yang akan di repair
5. Tekan R untuk memulai proses repair
6. Tunggu sampai reboot dan repair kembali dijalankan
7. Lihat proses nya setelah reboot. Jika sudah sampai pada proses Installing Devices, tekan Shift+F10 untuk memunculkan jendela command prompt.
8. Pada jendela command prompt, ketikkan NUSRMGR.CPL atau control userpasswords2 lalu tekan enter, untuk menampilkan jendela manajemen user windows. Dijendela inilah kita bisa melakukan reset password nya.
 Mungkin sampai disini dulu teman-temanku.semoga bermanfaat

Sunday, May 12, 2013

DOWNLOAD SERVICE PACK 1 WINDOWS 7 SEVEN

Windows 7 Service Pack 1 download.

If you have problems getting the service pack from Windows Update, you can download the SP1 installation package from the Microsoft Download Center, and then install SP1 manually.
  1. Go to the Windows 7 Service Pack 1 download webpage on the Microsoft website, and then click Continue.
  2. Choose either the 32-bit (x86) or the 64-bit (x64) version of SP1 depending on whether you're running the 32-bit or the 64-bit version of Windows 7, and then click Download.
    • To find out which version you're running, click the Start button The Start button, right-click Computer, and then click Properties. Under System, next to System type, you can view the operating system.
  3. To install SP1 immediately, click Open or Run, and then follow the instructions on your screen. To install SP1 later, click Save and download the installation file to your computer. When you're ready to install SP1, double-click the file.
  4. On the Install Windows 7 Service Pack 1 page, click Next.
  5. Follow the instructions on your screen. Your computer might restart during the installation.
  6. After installation is complete, log on to your computer at the Windows logon prompt. You might see a notification indicating whether the update was successful.
  7. If you disabled your antivirus software, enable it again.

SERVICE PACK 1 - INSTALLING SP I WINDOWS 7

Installing SP1 helps keep Windows 7.
Windows 7 Service Pack 1 (SP1).

How to get SP1

The recommended (and easiest) way to get SP1 is to turn on automatic updating in Windows Update in Control Panel, and wait for Windows 7 to notify you that SP1 is ready to install. It takes about 30 minutes to install, and you'll need to restart your computer about halfway through the installation.

To learn if Windows 7 SP1 is already installed

  • Click the Start button The Start button, right-click Computer, and then click Properties.
    If Service Pack 1 is listed under Windows edition, SP1 is already installed on your computer.

Disk space requirements

Make sure you have enough free disk space to install SP1 (even though much of that space will be reclaimed after the installation). If you need to create free disk space, go to Strategies for freeing disk space on the Windows website.
Installation method
Estimated amount of free disk space required
Windows Update

  • x86-based (32-bit): 750 MB
  • x64-based (64-bit): 1050 MB
Downloading SP1 from the Microsoft website

  • x86-based (32-bit): 4100 MB
  • x64-based (64-bit): 7400 MB
Installing SP1 using an installation DVD

  • x86-based (32-bit): 4100 MB
  • x64-based (64-bit): 7400 MB
Show all

Notes

  • For general information about service packs, go to the Service Pack Center webpage on the Windows website.
  • For technical information about SP1, such as release notes and the SP1 deployment guide, go to the Windows 7 Service Pack 1 resources webpage on the Microsoft TechNet website.